Standard Setup of Toolchain for Windows
Introduction
ESP-IDF requires some prerequisite tools to be installed so you can build firmware for supported chips. The prerequisite tools include Python, Git, cross-compilers, CMake and Ninja build tools.
For this Getting Started we are going to use the Command Prompt, but after ESP-IDF is installed you can use Eclipse Plugin or another graphical IDE with CMake support instead.
Note
Limitations: - The installation path of ESP-IDF and ESP-IDF Tools must not be longer than 90 characters. Too long installation paths might result in a failed build. - The installation path of Python or ESP-IDF must not contain white spaces or parentheses. - The installation path of Python or ESP-IDF should not contain special characters (non-ASCII) unless the operating system is configured with "Unicode UTF-8" support.
System Administrator can enable the support via Control Panel > Change date, time, or number formats > Administrative tab > Change system locale > check the option Beta: Use Unicode UTF-8 for worldwide language support > Ok > reboot the computer.
ESP-IDF Tools Installer
The easiest way to install ESP-IDF's prerequisites is to download one of ESP-IDF Tools Installers.
|
What Is the Usecase for Online and Offline Installer
Online Installer is very small and allows the installation of all available releases of ESP-IDF. The installer downloads only necessary dependencies including Git For Windows during the installation process. The installer stores downloaded files in the cache directory %userprofile%\.espressif
Offline Installer does not require any network connection. The installer contains all required dependencies including Git For Windows .
Components of the Installation
The installer deploys the following components:
The installer also allows reusing the existing directory with ESP-IDF. The recommended directory is %userprofile%\Desktop\esp-idf where %userprofile% is your home directory.
Launching ESP-IDF Environment
At the end of the installation process you can check out option Run ESP-IDF PowerShell Environment or Run ESP-IDF Command Prompt (cmd.exe). The installer launches ESP-IDF environment in selected prompt.
Run ESP-IDF PowerShell Environment:
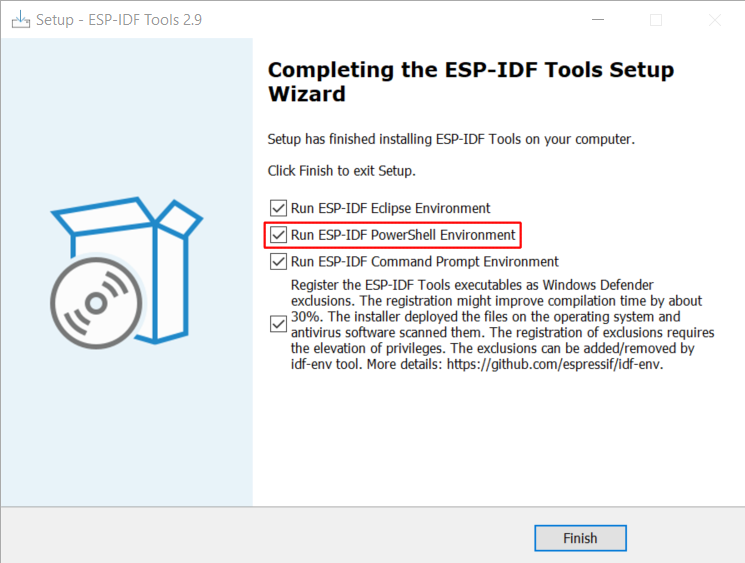
Completing the ESP-IDF Tools Setup Wizard with Run ESP-IDF PowerShell Environment
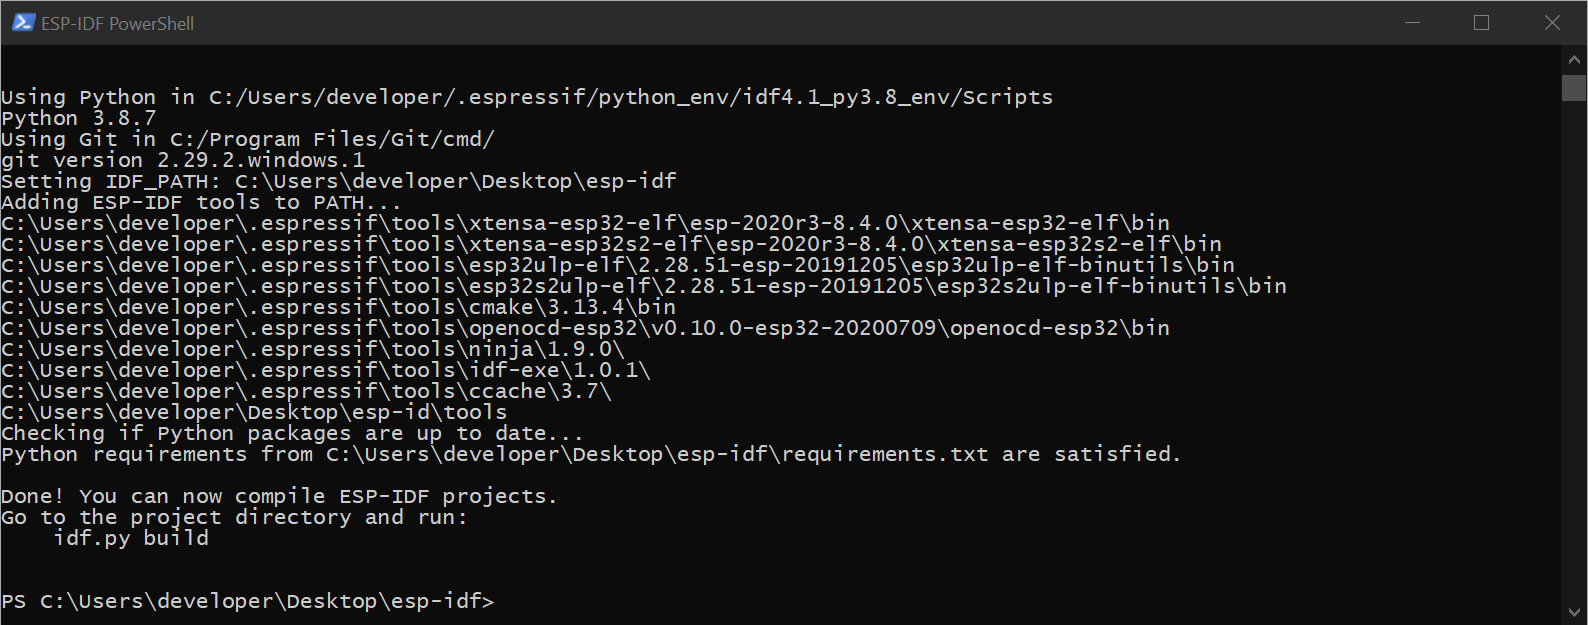
ESP-IDF PowerShell
Run ESP-IDF Command Prompt (cmd.exe):
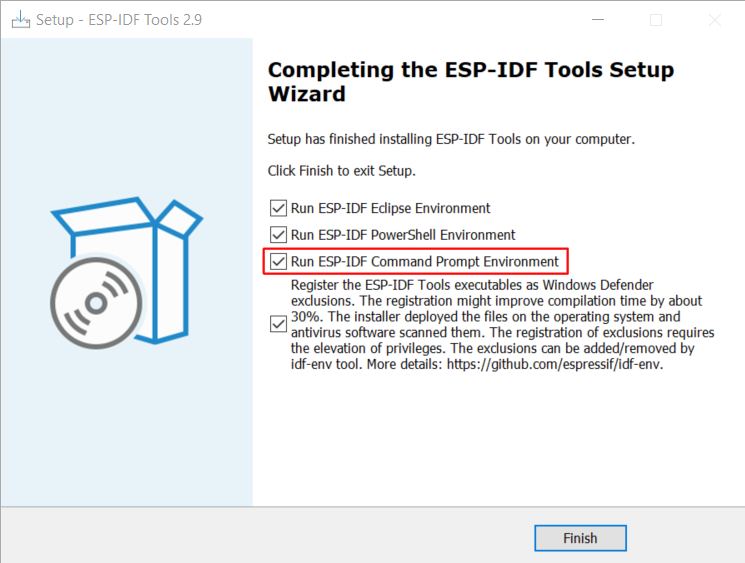
Completing the ESP-IDF Tools Setup Wizard with Run ESP-IDF Command Prompt (cmd.exe)
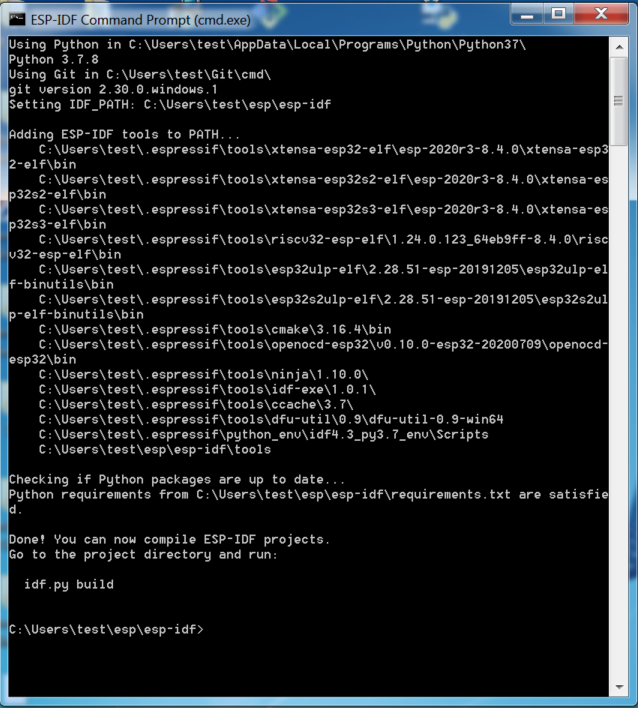
ESP-IDF Command Prompt
Using the Command Prompt
For the remaining Getting Started steps, we are going to use the Windows Command Prompt.
ESP-IDF Tools Installer also creates a shortcut in the Start menu to launch the ESP-IDF Command Prompt. This shortcut launches the Command Prompt (cmd.exe) and runs export.bat script to set up the environment variables (PATH, IDF_PATH and others). Inside this command prompt, all the installed tools are available.
Note that this shortcut is specific to the ESP-IDF directory selected in the ESP-IDF Tools Installer. If you have multiple ESP-IDF directories on the computer (for example, to work with different versions of ESP-IDF), you have two options to use them:
Create a copy of the shortcut created by the ESP-IDF Tools Installer, and change the working directory of the new shortcut to the ESP-IDF directory you wish to use.
Alternatively, run
cmd.exe, then change to the ESP-IDF directory you wish to use, and runexport.bat. Note that unlike the previous option, this way requires Python and Git to be present inPATH. If you get errors related to Python or Git not being found, use the first option.
First Steps on ESP-IDF
Now since all requirements are met, the next topic guides you on how to start your first project.
This guide helps you on the first steps using ESP-IDF. Follow this guide to start a new project on the ESP32 and build, flash, and monitor the device output.
Note
If you have not yet installed ESP-IDF, please go to Installation and follow the instruction in order to get all the software needed to use this guide.
Start a Project
Now you are ready to prepare your application for ESP32. You can start with get-started/hello_world project from examples directory in ESP-IDF.
Important
The ESP-IDF build system does not support spaces in the paths to either ESP-IDF or to projects.
Copy the project get-started/hello_world to ~/esp directory:
cd %userprofile%\esp
xcopy /e /i %IDF_PATH%\examples\get-started\hello_world hello_world
Note
There is a range of example projects in the examples directory in ESP-IDF. You can copy any project in the same way as presented above and run it. It is also possible to build examples in-place without copying them first.
Connect Your Device
Now connect your ESP32 board to the computer and check under which serial port the board is visible.
Serial port names start with COM in Windows.
If you are not sure how to check the serial port name, please refer to Establish Serial Connection with ESP32 for full details.
Note
Keep the port name handy as it is needed in the next steps.
Configure Your Project
Navigate to your hello_world directory, set ESP32 as the target, and run the project configuration utility menuconfig.
Windows
cd %userprofile%\esp\hello_world
idf.py set-target esp32
idf.py menuconfig
After opening a new project, you should first set the target with idf.py set-target esp32. Note that existing builds and configurations in the project, if any, are cleared and initialized in this process. The target may be saved in the environment variable to skip this step at all. See Select the Target Chip: set-target for additional information.
If the previous steps have been done correctly, the following menu appears:
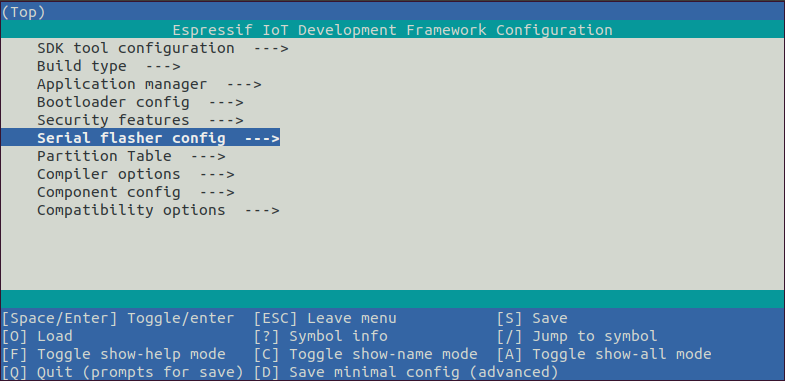
Project configuration - Home window
You are using this menu to set up project specific variables, e.g., Wi-Fi network name and password, the processor speed, etc. Setting up the project with menuconfig may be skipped for "hello_word", since this example runs with default configuration.
Attention
If you use ESP32-DevKitC board with the ESP32-SOLO-1 module, or ESP32-DevKitM-1 board with the ESP32-MIN1-1/1U module, please enable single core mode (CONFIG_FREERTOS_UNICORE) in menuconfig before flashing examples.
Note
The colors of the menu could be different in your terminal. You can change the appearance with the option --style. Please run idf.py menuconfig --help for further information.
If you are using one of the supported development boards, you can speed up your development by using Board Support Package. See Additional Tips for more information.
Build the Project
Build the project by running:
idf.py build
This command compiles the application and all ESP-IDF components, then it generates the bootloader, partition table, and application binaries.
$ idf.py build
Running cmake in directory /path/to/hello_world/build
Executing "cmake -G Ninja --warn-uninitialized /path/to/hello_world"...
Warn about uninitialized values.
-- Found Git: /usr/bin/git (found version "2.17.0")
-- Building empty aws_iot component due to configuration
-- Component names: ...
-- Component paths: ...

... (more lines of build system output)

[527/527] Generating hello_world.bin
esptool.py v2.3.1

Project build complete. To flash, run this command:
../../../components/esptool_py/esptool/esptool.py -p (PORT) -b 921600 write_flash --flash_mode dio --flash_size detect --flash_freq 40m 0x10000 build/hello_world.bin  build 0x1000 build/bootloader/bootloader.bin 0x8000 build/partition_table/partition-table.bin
or run 'idf.py -p PORT flash'
If there are no errors, the build finishes by generating the firmware binary .bin files.
Flash onto the Device
To flash the binaries that you just built for the ESP32 in the previous step, you need to run the following command:
idf.py -p PORT flash
Replace PORT with your ESP32 board's USB port name. If the PORT is not defined, the idf.py will try to connect automatically using the available USB ports.
For more information on idf.py arguments, see idf.py.
Note
The option flash automatically builds and flashes the project, so running idf.py build is not necessary.
Encountered Issues While Flashing? See the "Additional Tips" below. You can also refer to Flashing Troubleshooting page or Establish Serial Connection with ESP32 for more detailed information.
Normal Operation
When flashing, you will see the output log similar to the following:
...
esptool.py --chip esp32 -p /dev/ttyUSB0 -b 460800 --before=default_reset --after=hard_reset write_flash --flash_mode dio --flash_freq 40m --flash_size 2MB 0x8000 partition_table/partition-table.bin 0x1000 bootloader/bootloader.bin 0x10000 hello_world.bin
esptool.py v3.0-dev
Serial port /dev/ttyUSB0
Connecting........_
Chip is ESP32D0WDQ6 (revision 0)
Features: WiFi, BT, Dual Core, Coding Scheme None
Crystal is 40MHz
MAC: 24:0a:c4:05:b9:14
Uploading stub...
Running stub...
Stub running...
Changing baud rate to 460800
Changed.
Configuring flash size...
Compressed 3072 bytes to 103...
Writing at 0x00008000... (100 %)
Wrote 3072 bytes (103 compressed) at 0x00008000 in 0.0 seconds (effective 5962.8 kbit/s)...
Hash of data verified.
Compressed 26096 bytes to 15408...
Writing at 0x00001000... (100 %)
Wrote 26096 bytes (15408 compressed) at 0x00001000 in 0.4 seconds (effective 546.7 kbit/s)...
Hash of data verified.
Compressed 147104 bytes to 77364...
Writing at 0x00010000... (20 %)
Writing at 0x00014000... (40 %)
Writing at 0x00018000... (60 %)
Writing at 0x0001c000... (80 %)
Writing at 0x00020000... (100 %)
Wrote 147104 bytes (77364 compressed) at 0x00010000 in 1.9 seconds (effective 615.5 kbit/s)...
Hash of data verified.

Leaving...
Hard resetting via RTS pin...
Done
If there are no issues by the end of the flash process, the board will reboot and start up the "hello_world" application.
If you would like to use the Eclipse or VS Code IDE instead of running idf.py, check out Eclipse Plugin, VSCode Extension.
Monitor the Output
To check if "hello_world" is indeed running, type idf.py -p PORT monitor (Do not forget to replace PORT with your serial port name).
This command launches the IDF Monitor application:
$ idf.py -p <PORT> monitor
Running idf_monitor in directory [...]/esp/hello_world/build
Executing "python [...]/esp-idf/tools/idf_monitor.py -b 115200 [...]/esp/hello_world/build/hello_world.elf"...
--- idf_monitor on <PORT> 115200 ---
--- Quit: Ctrl+] | Menu: Ctrl+T | Help: Ctrl+T followed by Ctrl+H ---
ets Jun  8 2016 00:22:57

rst:0x1 (POWERON_RESET),boot:0x13 (SPI_FAST_FLASH_BOOT)
ets Jun  8 2016 00:22:57
...
After startup and diagnostic logs scroll up, you should see "Hello world!" printed out by the application.
    ...
    Hello world!
    Restarting in 10 seconds...
    This is esp32 chip with 2 CPU core(s), WiFi/BT/BLE, silicon revision 1, 2 MB external flash
Minimum free heap size: 298968 bytes
    Restarting in 9 seconds...
    Restarting in 8 seconds...
    Restarting in 7 seconds...
To exit IDF monitor use the shortcut Ctrl+].
If IDF monitor fails shortly after the upload, or, if instead of the messages above, you see random garbage similar to what is given below, your board is likely using a 26 MHz crystal. Most development board designs use 40 MHz, so ESP-IDF uses this frequency as a default value.

If you have such a problem, do the following:
Exit the monitor.
Go back to
menuconfig.Go to
Component config-->Hardware Settings-->Main XTAL Config-->Main XTAL frequency, then change CONFIG_XTAL_FREQ_SEL to 26 MHz.After that,
build and flashthe application again.
In the current version of ESP-IDF, main XTAL frequencies supported by ESP32 are as follows:
26 MHz
40 MHz
Note
You can combine building, flashing and monitoring into one step by running:
idf.py -p PORT flash monitor
See also:
IDF Monitor for handy shortcuts and more details on using IDF monitor.
idf.py for a full reference of
idf.pycommands and options.
That is all that you need to get started with ESP32!
Now you are ready to try some other examples, or go straight to developing your own applications.
Important
Some of examples do not support ESP32 because required hardware is not included in ESP32 so it cannot be supported.
If building an example, please check the README file for the Supported Targets table. If this is present including ESP32 target, or the table does not exist at all, the example will work on ESP32.
Additional Tips
Permission Denied Issue
With some Linux distributions, you may get the error message similar to Could not open port <PORT>: Permission denied: '<PORT>' when flashing the ESP32. This can be solved by adding the current user to the specific group, such as dialout or uucp group.
Python Compatibility
ESP-IDF supports Python 3.8 or newer. It is recommended to upgrade your operating system to a recent version satisfying this requirement. Other options include the installation of Python from sources or the use of a Python version management system such as pyenv.
Start with Board Support Package
To speed up prototyping on some development boards, you can use Board Support Packages (BSPs), which makes initialization of a particular board as easy as few function calls.
A BSP typically supports all of the hardware components provided on development board. Apart from the pinout definition and initialization functions, a BSP ships with drivers for the external components such as sensors, displays, audio codecs etc.
The BSPs are distributed via IDF Component Manager, so they can be found in IDF Component Registry.
Here is an example of how to add ESP-WROVER-KIT BSP to your project:
idf.py add-dependency esp_wrover_kit
More examples of BSP usage can be found in BSP examples folder.
Flash Erase
Erasing the flash is also possible. To erase the entire flash memory you can run the following command:
idf.py -p PORT erase-flash
For erasing the OTA data, if present, you can run this command:
idf.py -p PORT erase-otadata
The flash erase command can take a while to be done. Do not disconnect your device while the flash erasing is in progress.